搜索到
7
篇与
的结果
-
 typecho引入最新memos动态 我的演示:https://cmsblog.cn/memos.html代码是GPT写的新建一个页面,插入以下代码。CSS需要根据自己的主题来调整。 <?php // 分页参数 // 分页参数 $items_per_page = 10; // 每页显示的动态数量 $page = isset($_GET['page']) ? (int)$_GET['page'] : 1; // 当前页码,默认为 1 // 获取 RSS 数据 $rss_url = 'https://memos.cmsblog.cn/u/157104945@qq.com/rss.xml'; // 替换为你的 Memos RSS 网址 $rss_content = file_get_contents($rss_url); if ($rss_content === FALSE) { echo '无法获取 Memos 数据'; } else { // 解析 RSS 数据 $xml = simplexml_load_string($rss_content); if ($xml === FALSE) { echo '解析 RSS 数据失败'; } else { // 获取动态条目总数 $total_items = count($xml->channel->item); // 计算总页数 $total_pages = ceil($total_items / $items_per_page); // 检查页码是否有效 if ($page < 1) $page = 1; if ($page > $total_pages) $page = $total_pages; // 计算当前页的起始索引和结束索引 $start_index = ($page - 1) * $items_per_page; $end_index = $start_index + $items_per_page; // 遍历 RSS feed,显示当前页的动态 $count = 0; foreach ($xml->channel->item as $item) { if ($count >= $start_index && $count < $end_index) { $title = (string)$item->title; $link = (string)$item->link; $description = (string)$item->description; $pubDate = (string)$item->pubDate; // 转换时间(假设 RSS feed 中的时间是服务器时间,或者根据需要调整时区) // 这里假设 RSS feed 中的时间已经是正确的时区时间,所以直接格式化输出 // 如果需要转换时区,请使用 DateTime 类或 strtotime + date 函数进行转换 $pubDateFormatted = date('Y-m-d H:i:s', strtotime($pubDate)); // 格式化时间字符串 // 截取描述内容并添加链接 $excerpt = mb_substr($description, 0, 300); if (mb_strlen($description) > 300) { $excerpt .= '... <a href="' . $link . '" target="_blank">阅读更多</a>'; } else { $excerpt .= ' <a href="' . $link . '" target="_blank">查看原文</a>'; } // 输出动态内容 echo '<div class="memo-item">'; echo '<h3><a href="' . $link . '" target="_blank">' . $title . '</a></h3>'; echo '<p>' . $excerpt . '</p>'; echo '<p>时间:' . $pubDateFormatted . '</p>'; // 使用格式化后的时间 echo '</div>'; } $count++; } // 输出分页导航 echo '<div class="pagination">'; if ($page > 1) { echo '<a href="?page=' . ($page - 1) . '">上一页</a> '; } for ($i = 1; $i <= $total_pages; $i++) { if ($i == $page) { echo '<span>' . $i . '</span> '; } else { echo '<a href="?page=' . $i . '">' . $i . '</a> '; } } if ($page < $total_pages) { echo '<a href="?page=' . ($page + 1) . '">下一页</a>'; } echo '</div>'; } } ?>
 -
 Typecho 1.2.1 更新了 此版本主要是一个安全更新,建议所有用户升级。XSS 漏洞主要是 #1535, #1539, #1545, #1560 这几个 ISSUE 提到的错误。由于参数和对提交数据的过滤不严,造成了站点会被攻击者利用的漏洞。此次修复后你可以安全地打开已经被攻击者污染的评论数据,当然我们建议你删除它们。对 MySQL 的 SSL 支持在某些运行环境中你可能需要通过 SSL 来连接 MySQL 数据库,目前我们已经加上了这一支持。更多的小更新对 PHP 8.1 的更多支持其它 Bug 修复感谢各位贡献者的无私工作。具体更新请见:https://github.com/typecho/typecho/releases/tag/v1.2.0正式版下载:https://github.com/typecho/typecho/releases/latest/download/typecho.zip[attach]1426[/attach]
 -
 32MB 起航教程 小内存VPS搭建typecho博客教程 第一步 买 VPShttps://securedragon.net/clients/cart.php?a=add&pid=299发工单让客服改成 32MB第二步 配置基础环境换系统,换成Alpine,这个真的很省资源wget https://www.moerats.com/usr/shell/alpine.sh && bash alpine.sh安装 Lighttpd,别试 Caddy 了,虽然 Caddy 配置 SSL 方便,但是实际没有 Lighttpd 省资源apk add lighttpd rc-update add lighttpd default rc-service lighttpd restart安装 PHP,这个年头了,当然要 PHP 7啦,毕竟 Typecho 都迁移到 PHP 7.2 + 了apk add php7 php7-ctype php7-curl php7-dom php7-fpm php7-iconv php7-gd php7-json php7-openssl php7-pdo php7-pdo_sqlite php7-sqlite3 php7-xml php7-xmlreader php7-phar php7-posix php7-ftp php7-session php7-bcmath php7-mcrypt php7-sockets php7-mbstring php7-tokenizer修改 PHP 配置sed -i 's@^;date.timezone.*@date.timezone = Asia/Shanghai@' /etc/php7/php.inised -i "s@^memory_limit.*@memory_limit = 12M@" /etc/php7/php.inised -i "s|;cgi.fix_pathinfo=.|cgi.fix_pathinfo=1|i" /etc/php7/php.ini修改 Lighttpd 配置,启用 FastCGI、SSL、rewrite、redirectsed -i 's/# include "mod_fastcgi.conf"/ include "mod_fastcgi.conf\ninclude "mod_ssl.conf""/g' /etc/lighttpd/lighttpd.confsed -i 's/# "mod_rewrite","/ "mod_rewrite","/g' /etc/lighttpd/lighttpd.confsed -i 's/# "mod_redirect","/ "mod_redirect","/g' /etc/lighttpd/lighttpd.confrc-service lighttpd restartcat > /etc/lighttpd/mod_ssl.conf <<EOFserver.modules += ("mod_openssl")server.modules += ("mod_setenv")$HTTP["scheme"] == "https" {setenv.add-response-header = ( "Strict-Transport-Security" => "max-age=63072000; includeSubdomains; ")}第三步 配置虚拟主机先使用 acme.sh申请SSL证书,Lighttpd要求SSL证书和私钥放在一个文件里mkdir -p /web/32mb.cc chown -R lighttpd.lighttpd /web/32mb.cc export DP_Id=xxx export DP_Key=xxx acme.sh --issue --dns dns_dp -d 32mb.cc -d *.32mb.cc acme.sh --install-cert -d 32mb.cc \ --key-file /web/32mb.cc.key \ --fullchain-file /web/32mb.cc.crt \ --reloadcmd "cat /web/32mb.cc.key /web/32mb.cc.crt > /web/32mb.cc.pem; service lighttpd restart"新增虚拟主机,修改 /etc/lighttpd/lighttpd.conf,在最后一行之前加入# virtual host $HTTP["host"] =~ "^(www.)?32mb.cc" { server.document-root = "/web/32mb.cc" accesslog.filename = "/web/32mb.cc.log" $HTTP["scheme"] == "http" { # redirect to https, port 443: url.redirect = (".*" => "https://%0$0") } } $SERVER["socket"] == ":443" { ssl.engine = "enable" ssl.pemfile = "/web/32mb.cc.pem" $HTTP["host"] =~ "(^|www\.)32mb.cc" { ssl.pemfile = "/web/32mb.cc.pem" # 这是 typecho 的伪静态规则,其他程序自行修改 url.rewrite-if-not-file = ( "^/(admin|usr)/(.*)" => "/$1/$2", "^/(.*)$" => "/index.php/$1" ) } }然后就是安装 Typecho 啦
 -
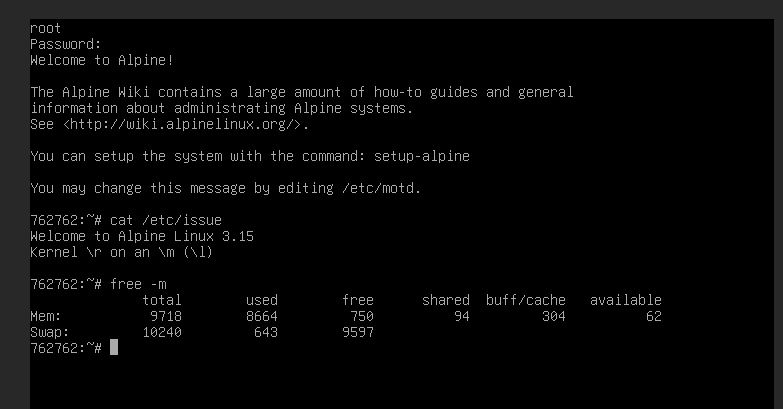
 64M小内存成功安装Apline+Caddy+PHP8+Sqlite3+typecho 接上文,继续折腾64M的小鸡。大点内存就不放静态网站了,搭个typecho吧。一、后台系统重装为Apline3.15版本,结果SSH不上了,老是拒绝密码。只能VNC进去,编辑vi /etc/ssh/sshd_config 修改 PermitRootLogin yes如果没有这个文件,先安装SSHapk add opensshrc-update add sshd/etc/init.d/sshd start 连接SSH后,编辑 vi /etc/resolv.conf 修改nameserver 2a03:7900:2:0:31:3:104:161二、安装PHP8apk add php8 php8-fpm php8-opcache php8-ctype php8-pdo_sqlite php8-session php8-curl php8-pdo_pgsql php8-sqlite3 php8-mbstring三、安装Caddy2apk add caddy四、配置网站vi /etc/caddy/Caddyfile64m.513513.xyz { root * /www encode gzip php_fastcgi localhost:9000 file_server }五、启动caddy php8rc-service caddy restart rc-service php8-fpm restart六、安装typecho七、探针:https://64m.513513.xyz/tz.php感想:目前伪静态没解决。速度个人觉得还能接受。
 -
 Typecho 评论验证插件 hCaptcha 最近的博客收到的垃圾邮件越来越多,虽然设置了简单的算术验证,但对于 bot 来说形同虚设,每天都能收到 10+ 的垃圾邮件,不得不上一些更有效的验证手段。研究了一圈网上能搜到的评论验证插件,基本上都是年久未修,最后准备使用 reCAPTCHAv3 这个插件,但考虑到 reCaptcha 在国内几乎不可用,所以在此基础上修改为了使用 hCaptcha 验证虽然在不少地区的体验也很糟糕。使用方法Github 地址:https://github.com/scenery/typecho-pluginsTypecho 版本:>= 1.2.0本站备份下载:[attach]1357[/attach]a. 注册 hCaptcha 账号,在 Sites 菜单栏里点击 New Site 添加一个网站获取 Site Key,点击你的头像 - Settings 获取 Secret Key。b. 下载插件,文件夹命名为 hCaptcha 后上传到网站 /usr/plugins/ 路径下。c. 进入网站后台-控制台-插件,点击启用:Site Key:第一步中获取的 Site KeySecret Key:第一步中获取的 Secret KeyWidget Theme:主题颜色,可设置 Light 或者 DarkWidget Size:样式大小,可设置 Normal 或者 Compact设置好后点击保存。d. 打开 /usr/themes/ 你的主题目录下 comments.php 文件,在提交按钮前面/后面插入下面代码:<?php hCaptcha_Plugin::output(); ?>*e. 网站管理员登录后不用进行验证,可直接提交评论。如果用户/游客提交评论失败,可能是开启了评论反垃圾保护导致,在网站后台-设置-评论里关闭,或者在主题目录下的 functions.php 文件中找到 function themeInit() 函数,里面添加:$options = Helper::options(); $options -> commentsAntiSpam = false;完成设置启用后,应该可以摆脱大部分垃圾评论了,后期可能会整合评论审核过滤和邮件提醒功能进去但 93.23% 的概率会鸽。
 -
 Joe主题-壁纸代码改造 前言Joe主题有写好的壁纸模版,直接启用即可。刚开始博主感觉分类太多了,有些分类也不是自己喜欢的。就没有启用,最近有时间研究了一下代码。改造了一下,只留下自己感兴趣的分类。核心代码主要是core/route.php文件内的两个函数,调用了360的壁纸接口,原版如下/* 获取壁纸分类 已测试 √ */ function _getWallpaperType($self) { $self->response->setStatus(200); $json = _curl("http://cdn.apc.360.cn/index.php?c=WallPaper&a=getAllCategoriesV2&from=360chrome"); $res = json_decode($json, TRUE); if ($res['errno'] == 0) { $self->response->throwJson([ "code" => 1, "data" => $res['data'] ]); } else { $self->response->throwJson([ "code" => 0, "data" => null ]); } } /* 获取壁纸列表 已测试 √ */ function _getWallpaperList($self) { $self->response->setStatus(200); $cid = $self->request->cid; $start = $self->request->start; $count = $self->request->count; $json = _curl("http://wallpaper.apc.360.cn/index.php?c=WallPaper&a=getAppsByCategory&cid={$cid}&start={$start}&count={$count}&from=360chrome"); $res = json_decode($json, TRUE); if ($res['errno'] == 0) { $self->response->throwJson([ "code" => 1, "data" => $res['data'], "total" => $res['total'] ]); } else { $self->response->throwJson([ "code" => 0, "data" => null ]); } }优化主要优化 _getWallpaperType 函数,去掉不想要的分类/* 获取壁纸分类 已测试 √ */ function _getWallpaperType($self) { $self->response->setStatus(200); $json = _curl("http://cdn.apc.360.cn/index.php?c=WallPaper&a=getAllCategoriesV2&from=360chrome"); $res = json_decode($json, TRUE); //$file=dirname(__FILE__).'/debug.log'; //保留喜欢的分类 $ilike = ['6', '12', '13', '22']; $re_arr = array(); foreach ($res['data'] as $key => $value) { if (in_array($value['id'], $ilike, true)){ //file_put_contents($file, $value['name']."\n",FILE_APPEND); array_push($re_arr, $value); } } if ($res['errno'] == 0) { $self->response->throwJson([ "code" => 1, "data" => $re_arr ]); } else { $self->response->throwJson([ "code" => 0, "data" => null ]); } }效果首页美女发现是固定的,又懒得翻页。加了个随机,每次刷新都是不同的。/* 获取壁纸列表 已测试 √ */ function _getWallpaperList($self) { $self->response->setStatus(200); $cid = $self->request->cid; //前50页随机显示图片 if (($cid == 6)&&($self->request->start < 2400)) { $start = $self->request->start + rand(1,4800); }else { $start = $self->request->start; } $count = $self->request->count; //$file=dirname(__FILE__).'/debug.log'; //file_put_contents($file, $cid."|".$start."|".$count."\n",FILE_APPEND); $json = _curl("http://wallpaper.apc.360.cn/index.php?c=WallPaper&a=getAppsByCategory&cid={$cid}&start={$start}&count={$count}&from=360chrome"); $res = json_decode($json, TRUE); if ($res['errno'] == 0) { $self->response->throwJson([ "code" => 1, "data" => $res['data'], "total" => $res['total'] ]); } else { $self->response->throwJson([ "code" => 0, "data" => null ]); } }
 -
在文章中添加地图 有些文章需要使用到地图,比如题主博客中的“有声”分类下的文章,例如 http://www.lopwon.com/1925.html可以通过以下介绍的方法,添加!一、在主题适当位置(比如footer.php末端)添加以下百度地图开放平台提供的服务代码。其中,把“我的秘钥”四个字替换为自己的百度地图API秘钥(AK),申请如下:1. 访问百度地图开放平台 https://lbsyun.baidu.com/ 注册后登陆“控制台”。2. 应用管理》我的应用》创建应用,需要实名认证!3. 除“应用类型”选择“浏览器端”外,其他可以默认。4. 完成创建后,会生成一串API秘钥(AK)。代码: <script src="https://api.map.baidu.com/api?type=webgl&v=1.0&ak=我的秘钥"></script> <script> var map = new BMapGL.Map('map'); //创建地图,map对应div中的ID,可自定义,必选 map.centerAndZoom(new BMapGL.Point(<?php $this->fields->location(); ?>), 13); //设置地图中心坐标location和缩放级别13,必选 var marker = new BMapGL.Marker(new BMapGL.Point(<?php $this->fields->location(); ?>)); //创建标记坐标location,必选 map.addOverlay(marker); //添加标记点,必选 map.enableScrollWheelZoom(true); //添加鼠标滚轮缩放控件,可选 map.addControl(new BMapGL.NavigationControl({type: BMAP_NAVIGATION_CONTROL_SMALL})); //添加放大缩小控件,可选 map.addControl(new BMapGL.MapTypeControl({mapTypes: [BMAP_NORMAL_MAP,BMAP_SATELLITE_MAP,BMAP_HYBRID_MAP]})); //添加地图类型,可选 </script>二、如果不想把以上JS在全局使用,可以使用以下代码包裹,只在需要时加载:代码: <?php if (($this->fields->location !== null) && ($this->is('post'))): //文章页post有自定义字段location的坐标值时加载以下JS ?> 这里是百度地图服务代码 <?php endif; ?>三、在编辑文章时,把以下代码添加到文中适当位置,当然也可以自定义CSS。如果不想每次都添加,可以直接放入主题post.php的适当位置(比如文末content)代码: <div id="map" style="width:720px;height:240px"></div>四、在编辑文章时,新增自定义字段location(也可以自定义字段名,注意要统一替换以上JS中所有的location)。之后,字段值填入地点坐标,可以访问拾取坐标系统 http://api.map.baidu.com/lbsapi/getpoint/index.html 获取坐标。格式为(经度,纬度),例116.403963,39.915119五、如果觉得操作麻烦,有款现成的Typecho“我的足迹”独立页模板可以选用,功能不同是把文章直接添加到地图中,详见 http://www.lopwon.com/lopwon-footprint.html1. 访问拾取坐标系统(http://api.map.baidu.com/lbsapi/getpoint/index.html)获取坐标。2. 在需要标记文章的自定义字段里新增字段,其中,字段名称必须填入 here,乱填无效!字段值填入之前获取的坐标。格式为(经度,纬度),例116.403963,39.915119


