

搜索到
83
篇与
的结果
-
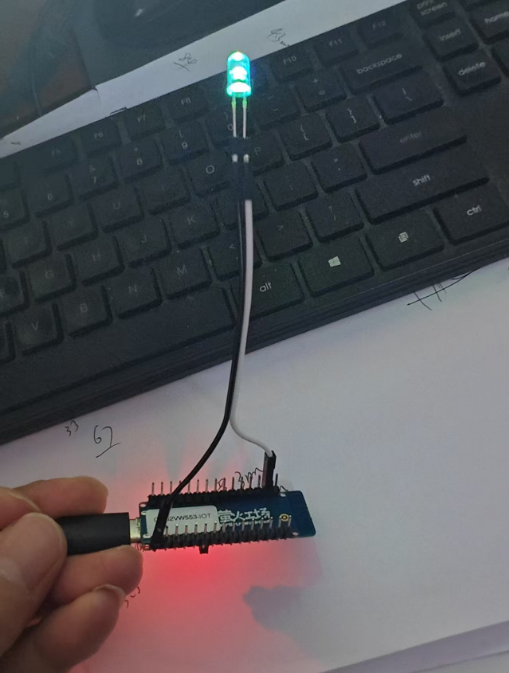
 GD32VW553-IOT开发版点灯教程 刷B站偶然看见iceasy.com的GD32VW553-IOT开发板送样活动,正好最近对单片机感兴趣,心血来潮就填了信息试一试,没想到真的成功收到货了!那就把这个作业交一下。中间等了好久,就是在等各位大佬的教程。(参考两篇才完成我的第一个点灯教程)期间也走了点小坑,差点放弃。但想着写程序不是从Hello world开始的吗?单片机的第一个点灯教程不能难倒才行。一、准备下载的软件(主要2个)https://www.gd32mcu.com/cn/download/7?kw=GD32VW5GD32 All-In-One Programmer文件是官方的烧录工具,待会给芯片烧录代码GD32 Embedded Builder是官方的ide,集成了开发环境和编译器,可以编写代码二、接线本着焊接水平太次的缘故,焊上拉电阻我是不敢搞,怕把开发板废了。但是有最新的接线方法了。如图:参考:https://www.iceasy.com/review/1902772074282168322三、准备TTL-usb的下载器连接上电脑,如果像我的这样没找到串口,就是没有安装ch340的驱动。找买TTL-usb的下载器的店家要一份。四、写代码打开GD32 Embedded Builder,(软件具体安装各大佬写的很详细了,就不介绍了。我是卡在这里导入官方的代码,修改后重建老是报错)新建一个项目,把src/main.c里的内容修改一下 参考:https://www.iceasy.com/review/1895134249755942914int main(void) { systick_config(); /* enable the LED clock */ rcu_periph_clock_enable(RCU_GPIOA); /* configure LED GPIO port */ gpio_mode_set(GPIOA, GPIO_MODE_OUTPUT, GPIO_PUPD_NONE, GPIO_PIN_10); /* reset LED GPIO pin */ gpio_bit_reset(GPIOA, GPIO_PIN_10); while(1) { /* turn on LED1, turn off LED3 */ gpio_bit_set(GPIOA, GPIO_PIN_10); delay_1ms(500); gpio_bit_reset(GPIOA, GPIO_PIN_10); delay_1ms(500); } }然后点菜单栏Project>Build All,如果没报错,就会在项目下面生成一个*.bin的固件。就是这个文件留着后面刷机用。五 、刷固件打开GD32 All-In-One Programmer,先点左侧的connetct,连接成功后。点右边的。下方显示100%后,就说明烧录成功了。取下下载器,接上电源,成功点亮了LED。人生第一次单片机点灯完成!感谢iceasy.com!
 -
Debian离线部署docker教程 1、转至 https://download.docker.com/linux/debian/dists/2、在列表中选择您的 Debian 版本。cat /etc/os-release我的版本号是debian 113、转到pool/stable/并选择适用的架构(amd64、 armhf、arm64或s390x)https://download.docker.com/linux/debian/dists/bullseye/pool/stable/amd64/4、在deb网址下,下载Docker Engine、CLI、containerd 和 Docker Compose 软件包的以下文件。然后上传到服务器里。5.安装dpkg -i *.deb直接省事了。自动修复所有缺少或未配置的软件包apt-get install -f6.验证安装docker -vsystemctl start docker7.docker-compose的安装可参考:https://cmsblog.cn/1340.htmlwm_embed_post ids=13408.设置镜像加速地址nano /etc/docker/daemon.json{ "registry-mirrors": ["https://docker.1ms.run"] }
-
typecho引入最新memos动态 我的演示:https://cmsblog.cn/memos.html代码是GPT写的新建一个页面,插入以下代码。CSS需要根据自己的主题来调整。 <?php // 分页参数 // 分页参数 $items_per_page = 10; // 每页显示的动态数量 $page = isset($_GET['page']) ? (int)$_GET['page'] : 1; // 当前页码,默认为 1 // 获取 RSS 数据 $rss_url = 'https://memos.cmsblog.cn/u/157104945@qq.com/rss.xml'; // 替换为你的 Memos RSS 网址 $rss_content = file_get_contents($rss_url); if ($rss_content === FALSE) { echo '无法获取 Memos 数据'; } else { // 解析 RSS 数据 $xml = simplexml_load_string($rss_content); if ($xml === FALSE) { echo '解析 RSS 数据失败'; } else { // 获取动态条目总数 $total_items = count($xml->channel->item); // 计算总页数 $total_pages = ceil($total_items / $items_per_page); // 检查页码是否有效 if ($page < 1) $page = 1; if ($page > $total_pages) $page = $total_pages; // 计算当前页的起始索引和结束索引 $start_index = ($page - 1) * $items_per_page; $end_index = $start_index + $items_per_page; // 遍历 RSS feed,显示当前页的动态 $count = 0; foreach ($xml->channel->item as $item) { if ($count >= $start_index && $count < $end_index) { $title = (string)$item->title; $link = (string)$item->link; $description = (string)$item->description; $pubDate = (string)$item->pubDate; // 转换时间(假设 RSS feed 中的时间是服务器时间,或者根据需要调整时区) // 这里假设 RSS feed 中的时间已经是正确的时区时间,所以直接格式化输出 // 如果需要转换时区,请使用 DateTime 类或 strtotime + date 函数进行转换 $pubDateFormatted = date('Y-m-d H:i:s', strtotime($pubDate)); // 格式化时间字符串 // 截取描述内容并添加链接 $excerpt = mb_substr($description, 0, 300); if (mb_strlen($description) > 300) { $excerpt .= '... <a href="' . $link . '" target="_blank">阅读更多</a>'; } else { $excerpt .= ' <a href="' . $link . '" target="_blank">查看原文</a>'; } // 输出动态内容 echo '<div class="memo-item">'; echo '<h3><a href="' . $link . '" target="_blank">' . $title . '</a></h3>'; echo '<p>' . $excerpt . '</p>'; echo '<p>时间:' . $pubDateFormatted . '</p>'; // 使用格式化后的时间 echo '</div>'; } $count++; } // 输出分页导航 echo '<div class="pagination">'; if ($page > 1) { echo '<a href="?page=' . ($page - 1) . '">上一页</a> '; } for ($i = 1; $i <= $total_pages; $i++) { if ($i == $page) { echo '<span>' . $i . '</span> '; } else { echo '<a href="?page=' . $i . '">' . $i . '</a> '; } } if ($page < $total_pages) { echo '<a href="?page=' . ($page + 1) . '">下一页</a>'; } echo '</div>'; } } ?>
-
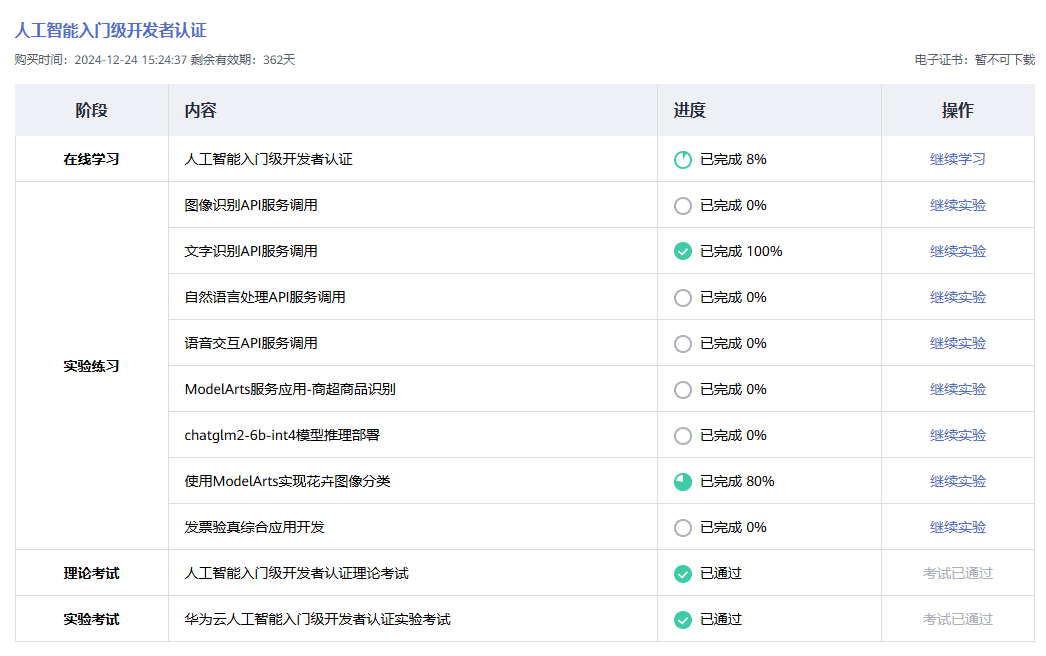
华为云学堂人工智能开发者认证训练营送500卷 活动链接:https://edu.huaweicloud.com/signup/886816346f6442c69234c053760e513a?medium=share_kfzlb&invitation=a2be848c0d894db1bc2d69aa212f4531 报名完成后,学习视频只要拉到最后面就可以很快完成。理论考试试题:https://blog.csdn.net/m0_64890295/article/details/144368615机考有3题,实验题里都有实操,先练习一遍应该能过。我抽中的1.参考这个实验题,很容易过https://lab.huaweicloud.com/testdetail_23322.这个实验题里有,但考试要自己写代码,我估计这题没得分。那个AK SK好像一直报错。我也没搞明白。3.实验题里有操作原型,稍微注意下就可以过。下载数据集,创建作业,最后obs桶策略要把权限改为公共读写
-
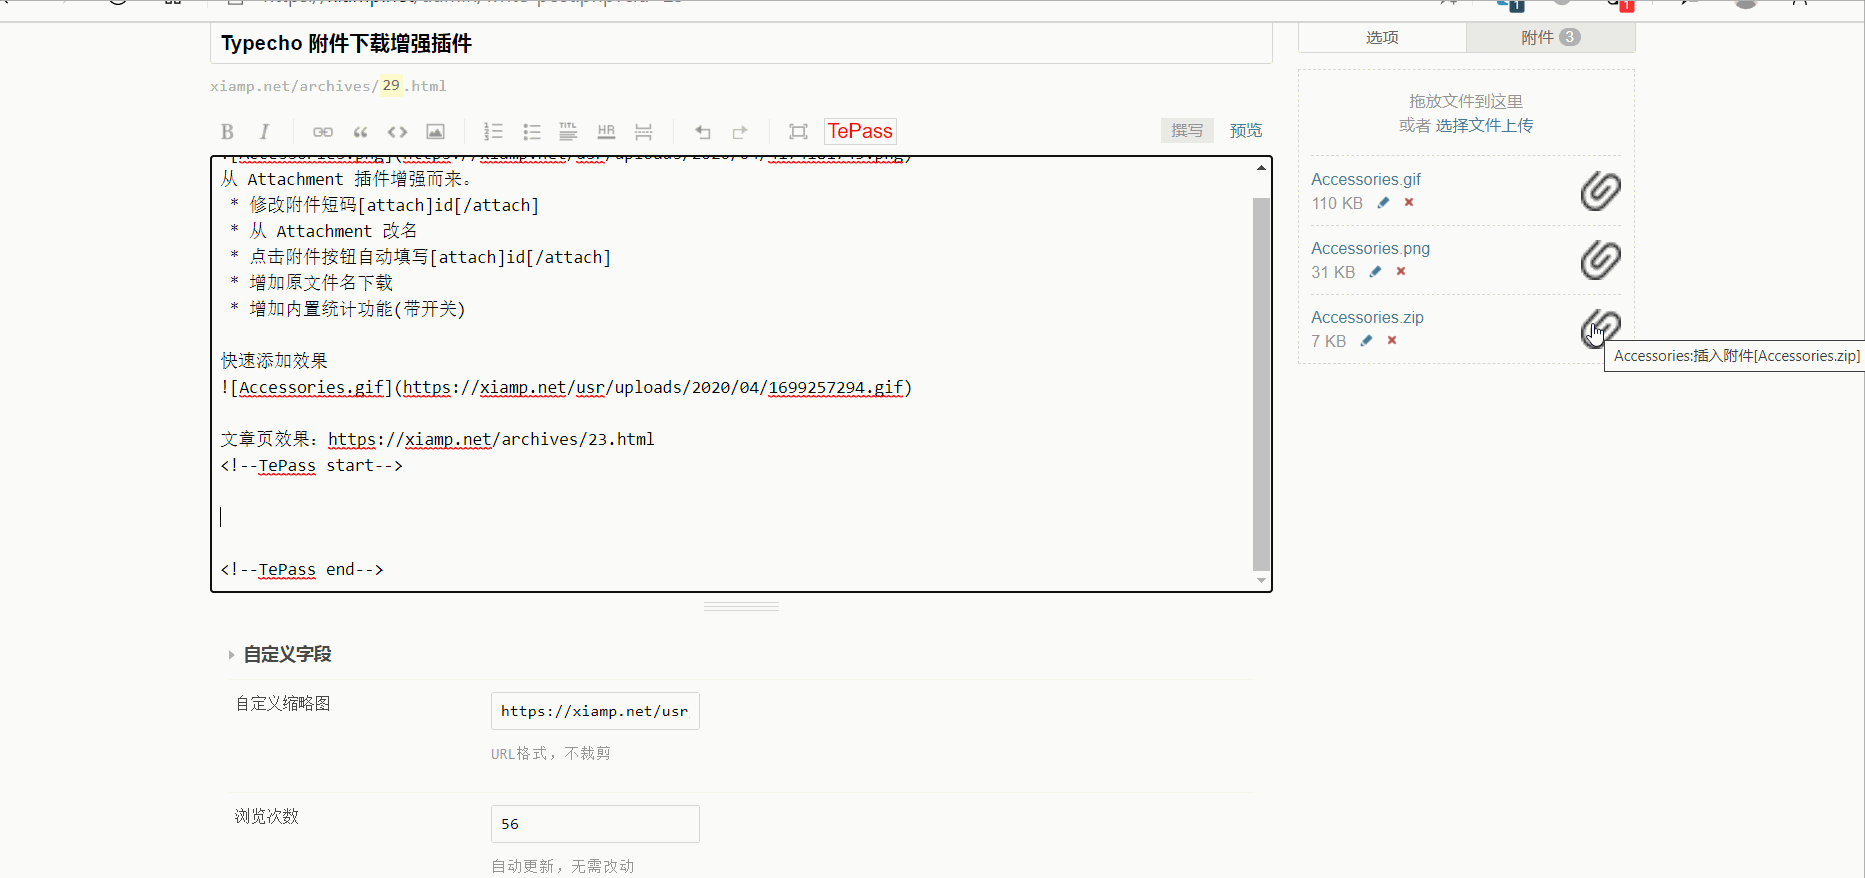
Typecho 主题模板:SimText 列表主题,真正的又快又简单 SimText 是一款非常简洁的文章列表主题,适合资讯列表类类目。这款主题对于 SEO 还是比较友好的,且结构简单,在默认主题的基础上创作的,视觉效果也比较 ok。作者是开放这款主题的版权的,但不提供下载。所以本着喜欢且开源的原则,我进行了二次创作。 Lighthouse 检测比较不错,手机端和电脑端都几乎是满分。主题首页请求只有 6 个,CSS 样式大约 14KB,还可以优化。自己配合做了动静分离后,首页加载大概只需要几毫秒。全主题除了使用代码高亮的 js 以外再无其它。主题预览地址:https://bosir.cn/simtextGitHub 下载地址:https://github.com/cnbosir/simtxt本站下载:[attach]1447[/attach]
-
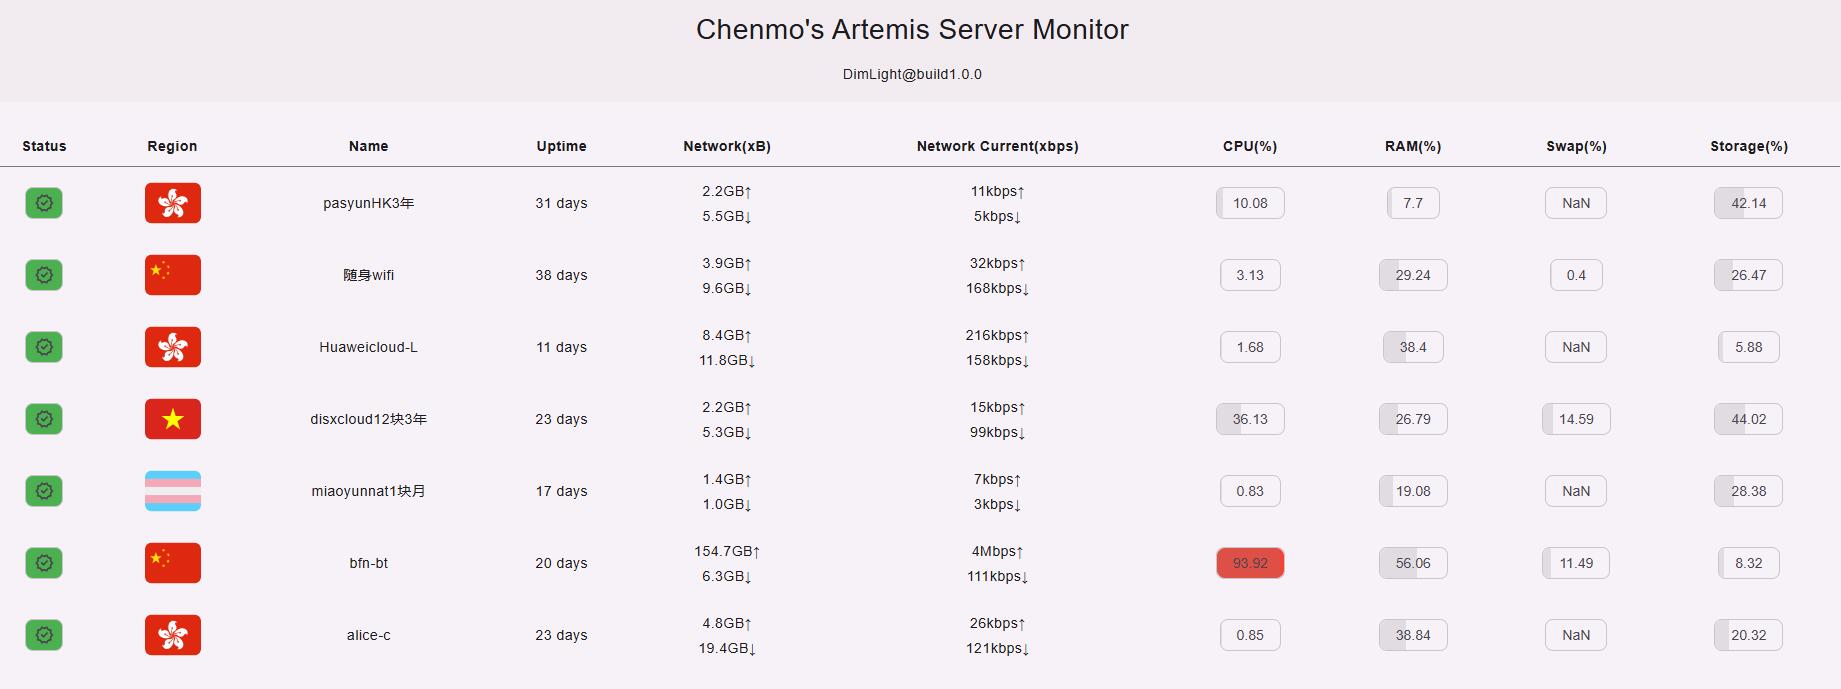
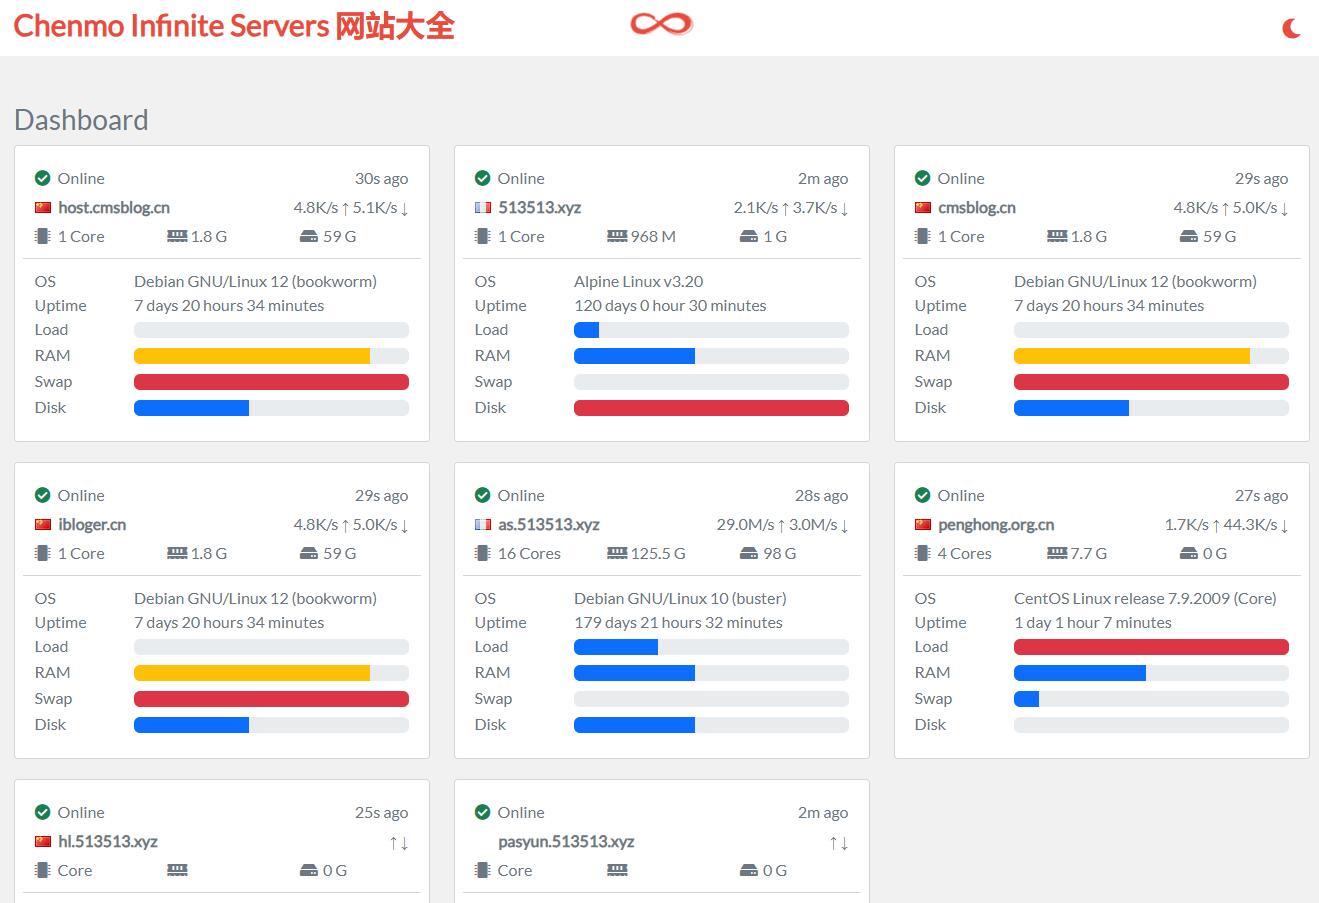
搭建Artemis Server Monitor探针教程 项目地址Firelookout Server NG | HPFS server monitor built with URN.tshttps://github.com/kwaitsing/Artemis演示地址https://vps.cmsblog.cn面板端搭建以debian为例记录一下。下载脚本:curl -fsSL https://github.com/kwaitsing/Artemis/releases/download/pkg/install_server.sh >install_server.sh执行安装 bash install_server.sh 8080 EPdnpTjAr0EV5yuDXFf5这里的端口和passkey需要和客户端的对上systemctl daemon-reloadsystemctl restart ArtemiServer访问ip:8080应该是404 page not found就说明服务端运行成功了。搭建前端1.安装caddysudo apt install -y debian-keyring debian-archive-keyring apt-transport-https curl curl -1sLf 'https://dl.cloudsmith.io/public/caddy/stable/gpg.key' | sudo gpg --dearmor -o /usr/share/keyrings/caddy-stable-archive-keyring.gpg curl -1sLf 'https://dl.cloudsmith.io/public/caddy/stable/debian.deb.txt' | sudo tee /etc/apt/sources.list.d/caddy-stable.list sudo apt update sudo apt install caddy2.下载前端源码至/artserver并解压 wget https://github.com/kwaitsing/Artemis/releases/download/DimLight%40build1.0.0/frontend.tar.gz3.设置caddy配置文件vi /etc/caddy/Caddyfile:80 { # Set this path to your site's directory. reverse_proxy /api* 127.0.0.1:8080 file_server { root /artserver } 4.启动caddysystemctl restart caddy前端就成功可以访问了。客户端搭建下载脚本curl -fsSL https://github.com/kwaitsing/Artemis/releases/download/pkg/install_client.sh >install_client.sh运行bash install_client.sh ws://example.com:8080 MyServer EPdnpTjAr0EV5yuDXFf5passkey要和之前设置的一样,MyServer可以随意,域名也可以直接用IPsystemctl daemon-reloadsystemctl restart ArtemisClient其它Alpine上也是可以部署服务端和客户端的,具体看https://github.com/kwaitsing/Artemis/blob/main/documents/enduser.md
-
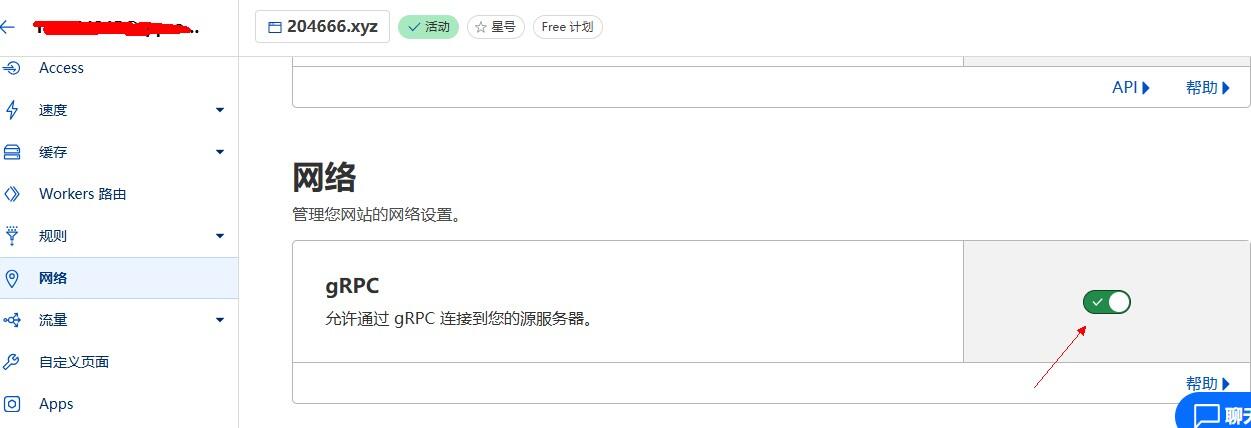
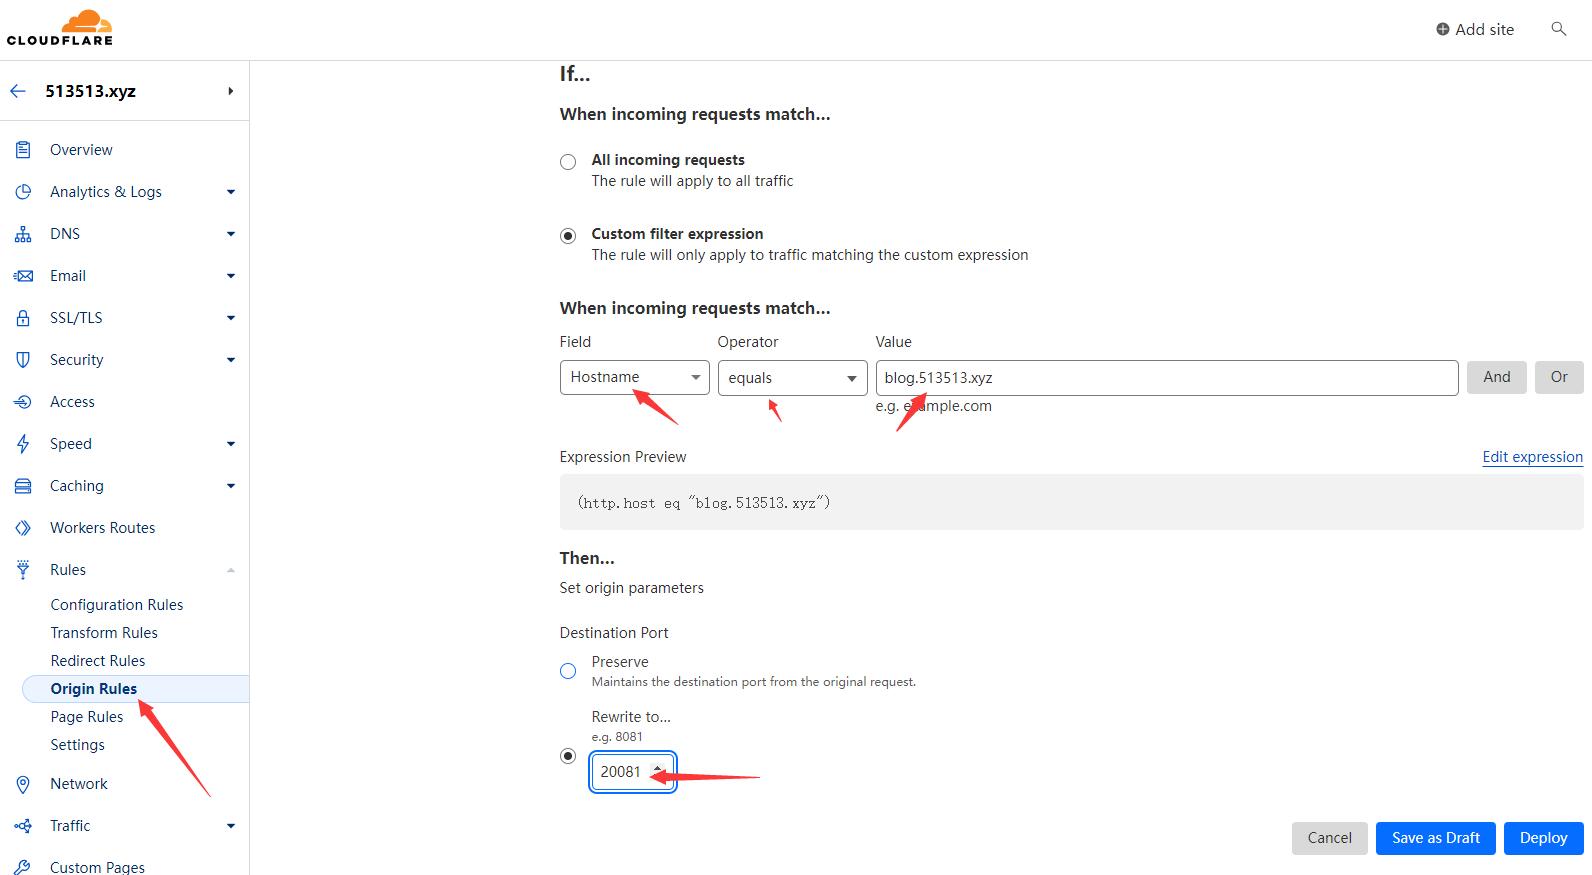
哪吒v1 Docker CloudFlare Tunnel版 哪吒v1 Docker CloudFlare Tunnel版项目地址:https://github.com/yumusb/nezha-new.git无需公网IP,全程都在CF下,项目优势:不暴露公网ip 防止被攻击单栈转双栈 ipv4 ipv6 都能用 纯ipv6 也方便挂探针除境内网络外 走cf基本都优化开箱即用 迁移备份方便Dashboard安装安装好docker申请 CloudFlare Tunnel Tokenhttps://developers.cloudflare.com/cloudflare-one/connections/connect-networks/get-started/create-remote-tunnel/CloudFlare开启GRPC流量代理https://developers.cloudflare.com/network/grpc-connections/启动服务 git clone https://github.com/yumusb/nezha-new.git编辑 .env 文件中的 TUNNEL_TOKEN 为自己申请的docker compose up -d 或者docker-compose.ymlservices: dashboard: image: ghcr.io/nezhahq/nezha restart: always volumes: - ./data:/dashboard/data nginx: image: nginx:stable-alpine restart: always volumes: - ./conf.d:/etc/nginx/conf.d depends_on: - dashboard tunnel: image: cloudflare/cloudflared restart: always command: tunnel run --protocol http2 environment: - TUNNEL_TOKEN depends_on: - dashboard服务端映射到CFCloudFlare Tunnel管理页 https://one.dash.cloudflare.com/ 加1个Public hostname 指向 http://nginx:80Dashboard配置/dashboard/settings 里面设置一下仪表板服务器域名/IP(无 CDN)上面的 Public hostname真实IP请求头 可以写nz-realip或者CF-Connecting-IPAGENTdashboard右上角复制安装命令,注意手动修改参数中的8008端口为443,TLS改为True。DOCKER 安装 AGENT(可选)其他后台地址 /dashboard默认密码 admin/admin演示地址:https://nezha.204666.xyz/
-
-
rsync远程同步安装走过的坑 这几天在折腾同步的事,发现rsync蛮好用的。记(又)录(水)一下(篇):一、安装apt install rsync二、配置碰到最大的坑就是rsync --daemon后,rsync启动不了,发现没有873端口服务,结果是配置文件写错了。修改配置文件 vim /etc/rsyncd.conf[mm] path = /test/ ignore errors = yes read only = no write only = no hosts allow = 192.168.0.0/16 hosts deny = * list = false uid = root gid = root auth users = zzz secrets file = /etc/rsyncd.passwdecho "zzz:123456" >/etc/rsyncd.passwdchmod 600 /etc/rsyncd.passwd启动运行rsync --daemonss -luntp 或 netstat -luntp就能看到873端口服务启动成功了,如果没有,systemctl status rsyncd查看原因。使用客户端配置一下密码echo "111111" > /etc/rsyncd.passwdrsync -avz zzz@192.168.101.28::模块名 DEST --password-file=/etc/rsyncd.passwd计划任务使用宝塔的计划任务每天执行一次就行。参考文章https://juejin.cn/post/6888708683929223175https://www.cnblogs.com/wujuntian/p/16410235.html
-
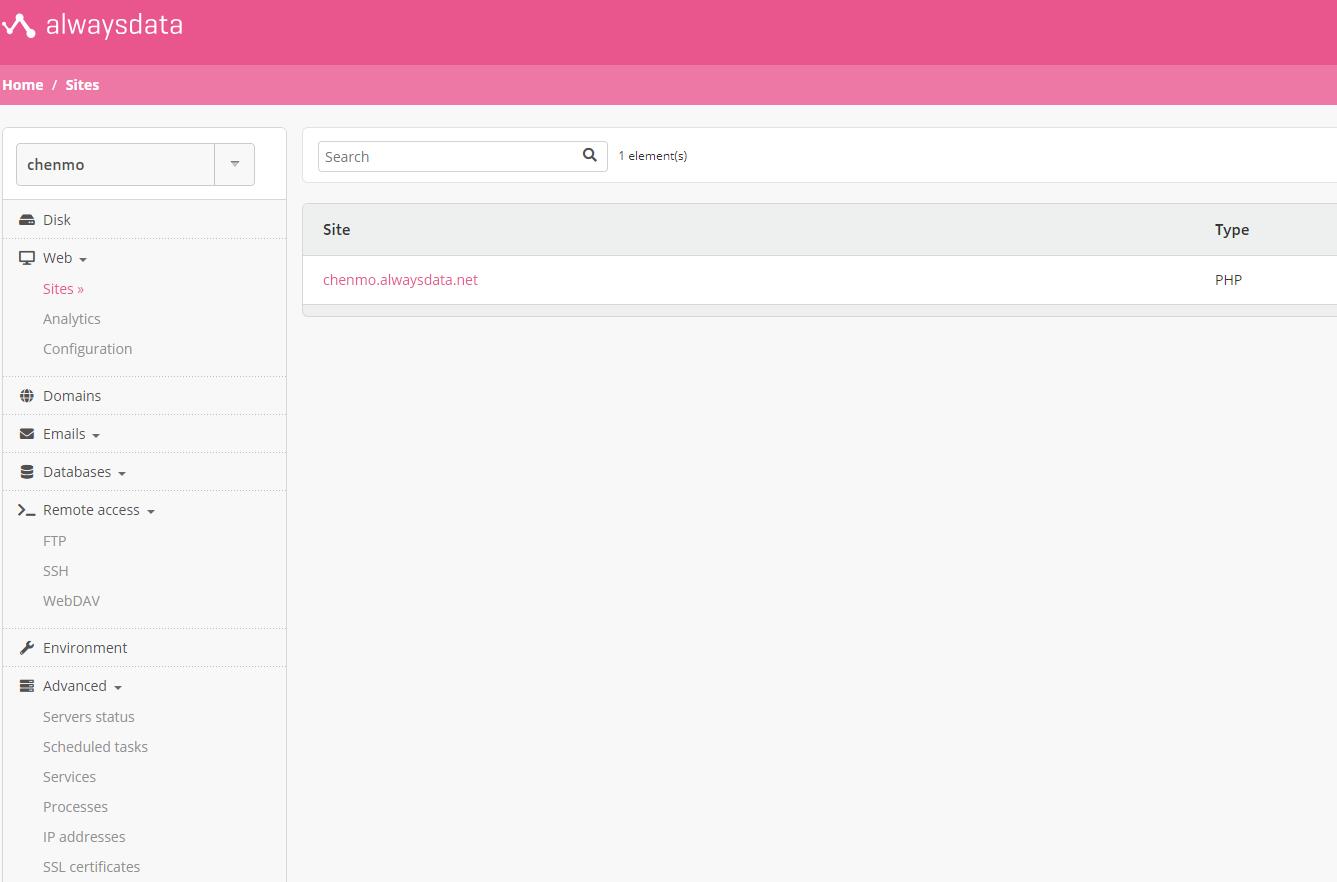
alwaysdata提供100M的免费空间 lwaysdata提供100M的免费空间注册地址:https://www.alwaysdata.com/en/100 MB free web hosting with support for MySQL, PostgreSQL, CouchDB, MongoDB, PHP, Python, Ruby, Node.js, Elixir, Java, Deno, custom web servers, access via FTP, WebDAV and SSH; mailbox, mailing list and app installer included.之前不知道什么原因没有注册成功,今天注册好了所以发出来。演示地址:https://chenmo.alwaysdata.com/绑定的域名:https://as.513513.xyz
-
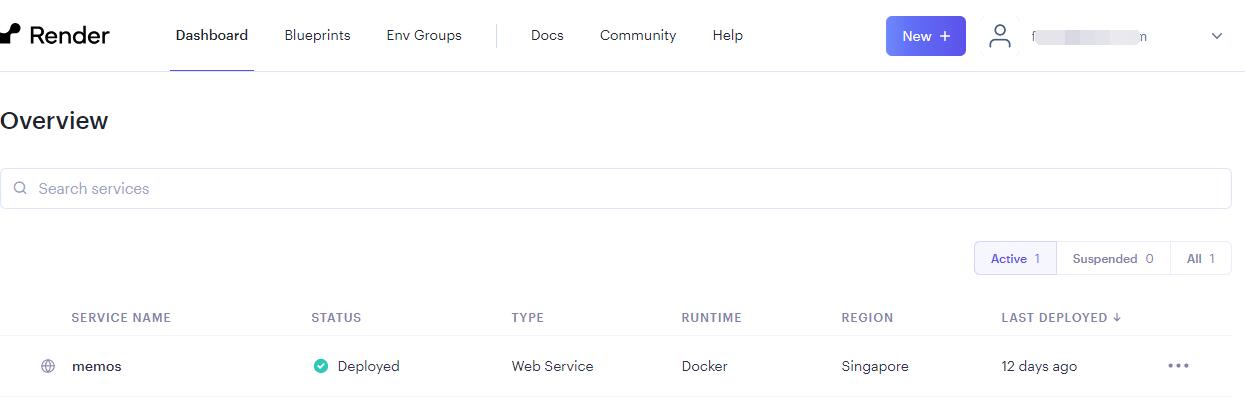
基于 render 免绑信用卡零成本搭建 memos 基于 render 免绑信用卡零成本搭建 memos下面是部署过程:一、创建 Web Service地址:https://dashboard.render.com/create?type=web使用 render 创建 Web Service,选择 Deploy an existing image from a registryImage URL:填写为 neosmemo/memos:stableName:自己随便填Region:地区选择 singapore,相比其他几个地区,从大陆访问选择新加坡速度是最快的For hobby projects:选择 Free $0/month 512 MB (RAM) 0.1 CPUEnvironment Variables:添加环境变量 Key:port,Value:5230以上填写完成后点击 Create Web Service部署完成二、添加网站监控由于免费版 render 程序在一定时间内没有访问程序会自动进入休眠状态,需要通过网站监控保障持续运行。示例https://yhzmemos.onrender.com/explorehttps://memos-altg.onrender.com
-
-
-
Typecho视频主题ZeVideo开源、助力Typecho多方面发展 ZeVideo一款开源的Typecho视频主题,相对于前段时间放出来的免费版重构了很多东西,也增加了一些功能。功能介绍全站pjax无刷新加载支持根据系统进入深色模式,或手动切换支持记录播放历史功能首页布局支持自定义主题设置支持修改logo,添加统计代码,这是广告位广告等生态方面支持 https://github.com/jrotty/CatClaw 采集插件可对接大部分资源站 json接口支持多条件检索(需要购买这个插件 https://blog.zezeshe.com/archives/gjsoso-typecho.html 【历史原因这个插件一直为付费插件,所以不能免费】)开源地址https://github.com/jrotty/Zevideogithub.com对typecho改动1,让文章根据最后编辑时间排序在 Typecho 的 var/Widget路径下编辑 Archive.php文件,在 764行左右找到如下代码 $select->order('table.contents.created', Db::SORT_DESC) ->page($this->currentPage, $this->parameter->pageSize);将其改为 $select->order('table.contents.modified', Db::SORT_DESC) ->page($this->currentPage, $this->parameter->pageSize);2,修改数据库结构因为是用自定义字段存每集动漫的视频地址的,然而像是柯南这种上千集的,字段数据库表格存不下,所以我将数据库fields表str_value的类型由text改为了mediumtext。截图展示备份下载:[attach]1428[/attach]
-
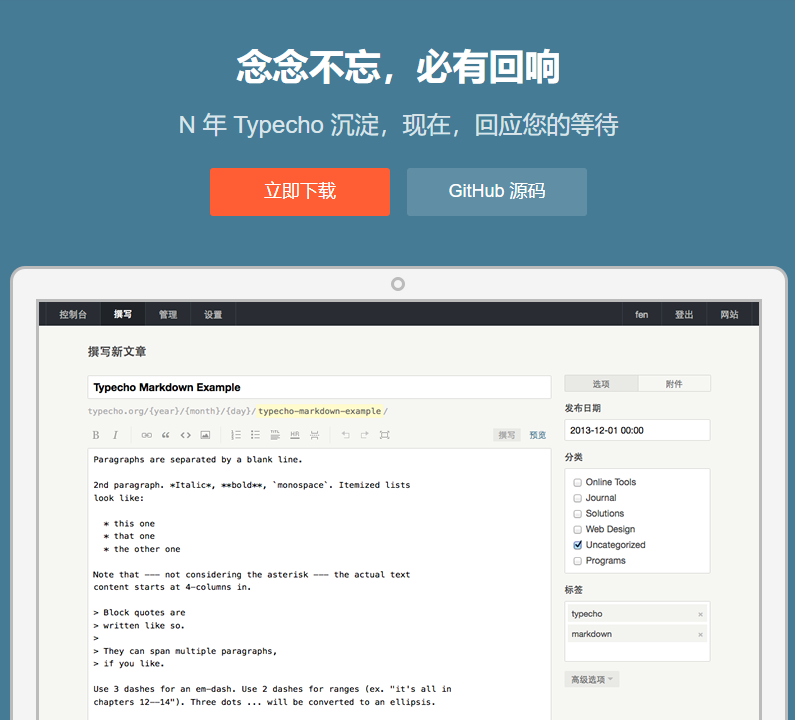
Typecho 1.2.1 更新了 此版本主要是一个安全更新,建议所有用户升级。XSS 漏洞主要是 #1535, #1539, #1545, #1560 这几个 ISSUE 提到的错误。由于参数和对提交数据的过滤不严,造成了站点会被攻击者利用的漏洞。此次修复后你可以安全地打开已经被攻击者污染的评论数据,当然我们建议你删除它们。对 MySQL 的 SSL 支持在某些运行环境中你可能需要通过 SSL 来连接 MySQL 数据库,目前我们已经加上了这一支持。更多的小更新对 PHP 8.1 的更多支持其它 Bug 修复感谢各位贡献者的无私工作。具体更新请见:https://github.com/typecho/typecho/releases/tag/v1.2.0正式版下载:https://github.com/typecho/typecho/releases/latest/download/typecho.zip[attach]1426[/attach]
-
worker反代Loc,解决不能发帖和投票的 问题 又来一个版本。直接在CF的worker里添加代码。添加路由的时候,记得网址后面有/*又弄了一个演示:https://loc.513513.xyz2023-5-25 16:491.修复头像2.修复交易帖显示缺失直接上代码:/** * write by 西柚论坛 https://www.xiubbs.com */ addEventListener('fetch', event => { event.respondWith(handleRequest(event.request)); }); // 准备反代的目的域名 let target_url = "https://hostloc.com"; // 要替换内容的正则表达式 let target_url_reg = /(?<=\/\/).*?hostloc\.com/g; async function handleRequest(request) { let url = new URL(request.url); url.hostname = new URL(target_url).hostname; // 复制请求对象并更新它的属性 let headers = new Headers(request.headers); headers.set("Referer", target_url); headers.set("User-Agent", "Mozilla/5.0 (Windows NT 10.0; Win64; x64) AppleWebKit/537.36 (KHTML, like Gecko) Chrome/113.0.0.0 Safari/537.36"); //处理头像的302跳转,处理编辑帖子之后的报错 let redirect = "manual"; if(url.href.indexOf("/uc_server/") > -1){ redirect = "follow"; } const param = { method: request.method, headers: headers, body: request.body, redirect: redirect } let response = await fetch(url, param); // 检查响应头中的内容类型 const contentType = response.headers.get('content-type'); if (contentType && contentType.includes('text')) { // 如果是文本类型,替换响应主体中的URL let responseBody = await response.text(); responseBody = await handleResBody(request,responseBody); // 复制响应对象并更新它的属性 let headers = await handleResHeader(response); return new Response(responseBody, { status: response.status, statusText: response.statusText, headers: headers }); } else { // 如果不是文本类型,直接返回响应对象 return response; } } async function handleResBody(request, responseBody){ responseBody = responseBody.replace(target_url_reg, new URL(request.url).hostname); responseBody = responseBody.replace("<head>", '<head>\n<meta name="viewport" content="width=device-width, initial-scale=1.0, maximum-scale=1.0, user-scalable=no">'); responseBody = responseBody.replace("</head>", '<link rel="stylesheet" type="text/css" href="//cdn.jsdelivr.net/gh/lifespy/css-and-js-hub@0.1/css/responsive.css">\n</head>'); responseBody = responseBody.replace("</body>", '<script src="//cdn.jsdelivr.net/gh/lifespy/css-and-js-hub@0.1/js/polish.js" type="text/javascript"></script>\n</body>'); return responseBody; } async function handleResHeader(resp){ let headers = new Headers(resp.headers); headers.set('Access-Control-Allow-Origin', '*'); headers.set('Access-Control-Allow-Methods', 'GET'); headers.set('Access-Control-Allow-Headers', 'Content-Type'); return headers; }还有一个个nginx版本server { listen 80; listen [::]:80; server_name loc.xiu.ee; #SSL Configuration listen 443 ssl; listen [::]:443 ssl; ssl_certificate /ssl/loc.xiu.ee.crt; ssl_certificate_key /ssl/loc.xiu.ee.key; ssl_session_timeout 5m; ssl_protocols TLSv1 TLSv1.1 TLSv1.2; ssl_ciphers ECDHE-RSA-AES128-GCM-SHA256:HIGH:!aNULL:!MD5:!RC4:!DHE; ssl_prefer_server_ciphers on; if ($scheme = http) { return 301 https://$server_name$request_uri; } # proxy to another site location ~/ { proxy_pass https://hostloc.com; proxy_set_header Host hostloc.com; proxy_set_header X-Real-IP $remote_addr; proxy_set_header X-Forwarded-For $proxy_add_x_forwarded_for; proxy_set_header REMOTE-HOST $remote_addr; proxy_set_header referer https://hostloc.com/$request_uri; proxy_set_header Accept-Encoding ""; proxy_set_header User-Agent "Mozilla/5.0 (Windows NT 10.0; Win64; x64; rv:109.0) Gecko/20100101 Firefox/114.0"; sub_filter_types *; sub_filter '<base href="https://hostloc.com/">' '<meta name="viewport" content="width=device-width, initial-scale=1.0, maximum-scale=1.0, user-scalable=no"><link rel="stylesheet" type="text/css" href="//cdn.jsdelivr.net/gh/lifespy/css-and-js-hub/css/responsive.css" />'; sub_filter 'hostloc.com' 'loc.xiu.ee'; sub_filter '</body>' '<script src="//cdn.jsdelivr.net/gh/lifespy/css-and-js-hub/js/polish.js"></script></body>'; sub_filter_once off; set $static_fileEJLfi5A0 0; if ( $uri ~* "\.(gif|png|jpg|css|js|woff|woff2)$" ) { set $static_fileEJLfi5A0 1; expires 12h; } if ( $static_fileEJLfi5A0 = 0 ) { add_header Cache-Control no-cache; } } }
-
用CFworkers部署的所以不用担心泄露账号密码问题 用CFworkers部署的所以不用担心泄露账号密码问题所有功能正常源码:https://bijici.com/6wmzHviewhttps://hostloc.us/备份:addEventListener('fetch', event => { event.respondWith(handleRequest(event.request)); }); const TARGET_URL = "https://hostloc.com"; const TARGET_URL_REGEXP = /hostloc\.com/g; const TARGET_HOSTNAME = new URL(TARGET_URL).hostname; const handleRequest = async request => { const url = new URL(request.url); url.hostname = TARGET_HOSTNAME; let headers = new Headers(request.headers); headers.set("Referer", TARGET_URL); headers.set("User-Agent", request.headers.get("user-agent")); const param = { method: request.method, headers: headers, body: request.body, redirect: "manual" } const response = await fetch(url, param); return handleResponse(request, response); } const handleResponse = async (request, response) => { const contentType = response.headers.get('content-type'); let headers = new Headers(response.headers); headers.set('Access-Control-Allow-Origin', '*'); headers.set('Access-Control-Allow-Methods', 'GET'); headers.set('Access-Control-Allow-Headers', 'Content-Type'); let location = response.headers.get('location'); if (location) { location = location.replace(TARGET_URL_REGEXP, new URL(request.url).hostname); headers.set('location', location); } const data = (contentType && contentType.includes('text')) ? await response.text() : await response.blob(); const modifiedData = (typeof data === 'string') ? data.replace(TARGET_URL_REGEXP, new URL(request.url).hostname) : data; return new Response(modifiedData, { status: response.status, statusText: response.statusText, headers: headers }); }PS:我自己也弄了一个反代:https://mjj.513513.xyz
-
HTML5实现微信聊天气泡效果 HTML5实现微信聊天气泡效果图: 话不多说直接放代码:<div class="container-manc"> <!-- Notice/Center --> <div class="chat-notice"> <span>漫川邀请“汤圆”进入群聊</span> </div> <!-- Left --> <div class="chat-sender"> <div><img src="http://q.qlogo.cn/headimg_dl?dst_uin=82632418&spec=640&img_type=jpg"></div> <div>汤圆</div> <div> <div class="chat-left_triangle"></div> <span>哇!博主的站点真的好好看,请问如何给博主进行留言呢?</span> </div> </div> <!-- Right --> <div class="chat-receiver"> <div><img src="http://q.qlogo.cn/headimg_dl?dst_uin=28422961&spec=640&img_type=jpg"></div> <div>漫川</div> <div> <div class="chat-right_triangle"></div> <span>您可以在下面与博主进行留言,看到会回复您的喔!</span> </div> <!-- Right --> <div class="chat-receiver"> <div><img src="http://q.qlogo.cn/headimg_dl?dst_uin=28422961&spec=640&img_type=jpg"></div> <div>漫川</div> <div> <div class="chat-right_triangle"></div> <span>您的每句话都会记录在漫川站点的数据库里,直到风消失的那天.</span> </div> </div>CSS代码:/*微信聊天气泡*/ .chat-sender{ clear:both; font-size: 80%; } .chat-sender div:nth-of-type(1){ float: left; } .chat-sender div:nth-of-type(2){ margin: 0 50px 2px 50px; padding: 0px; color: #848484; font-size: 70%; text-align: left; } .chat-sender div:nth-of-type(3){ background-color: #efefef; /*float: left;*/ margin: 0 50px 10px 50px; padding: 10px 10px 10px 10px; border-radius:7px; text-indent: -12px; } .chat-receiver{ clear:both; font-size: 80%; } .chat-receiver div:nth-of-type(1){ float: right; } .chat-receiver div:nth-of-type(2){ margin: 0px 50px 2px 50px; padding: 0px; color: #848484; font-size: 70%; text-align: right; } .chat-receiver div:nth-of-type(3){ /*float:right;*/ background-color: #b2e281; margin: 0px 50px 10px 50px; padding: 10px 10px 10px 10px; border-radius:7px; } .chat-receiver div:first-child img, .chat-sender div:first-child img{ width: 40px; height: 40px; border-radius: 10%; } .chat-left_triangle{ height: 0px; width: 0px; border-width: 6px; border-style: solid; border-color: transparent white transparent transparent; position: relative; left: -22px; top: 3px; } .chat-right_triangle{ height: 0px; width: 0px; border-width: 6px; border-style: solid; border-color: transparent transparent transparent #b2e281; position: relative; right:-22px; top:3px; } .chat-notice{ clear: both; font-size: 70%; color: white; text-align: center; margin-top: 15px; margin-bottom: 15px; } .chat-notice span{ background-color: #cecece; line-height: 25px; border-radius: 5px; padding: 5px 10px; }
-
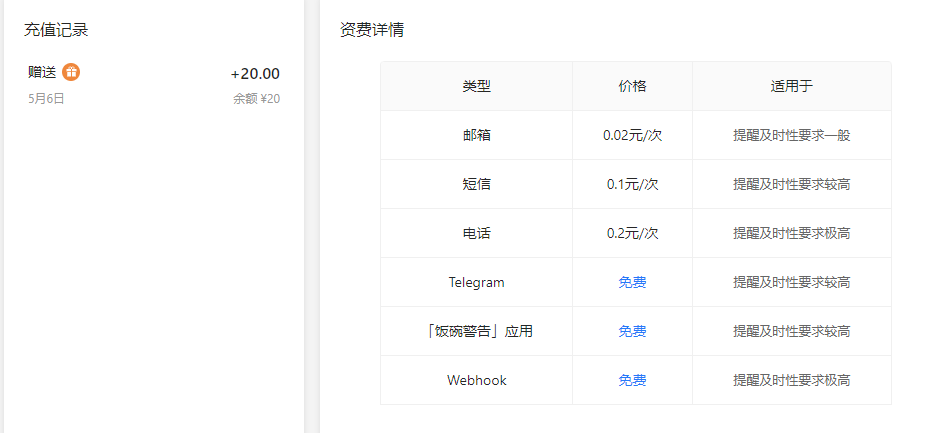
typecho评论推送插件Comment2Fanwan Comment2FanwanTypecho 新评论饭碗警告通知注册送20元余额,发现里面的Telegram是免费的。说明因为微信服务号模板消息将在 2021.04.30 改版,届时 Server酱 将无法正常使用,依赖于它的 Comment2Wechat 也将无法正常使用,故开发此插件使用方法点此下载后解压,将解压后的目录名改为 Comment2Fanwan,然后上传到你的 Typecho 的 /usr/plugins,并在 Typecho 后台开启插件到饭碗警告里创建规则,并将触发方式设置成 Webhook,接着创建五个变量名 和 键为后面所列的模板变量:title、author、comment、created_at、url, 可参考以下截图: 最后在通知正文添加{{ author }} 于 {{ created_at }} 在您的文章<a href="{{ url }}">《{{ title }}》</a>发表了评论: {{ comment }}当然,你也可以按照你的喜好修改文案,本插件会向饭碗推送 title、author、comment、created_at、url 这几个模板变量,在正文中用诸如 {{ author}} 的写法即可,它会动态替换将你创建的规则的 Webhook 地址填到插件设置里,保存即可。本站备份下载:[attach]1421[/attach]
-